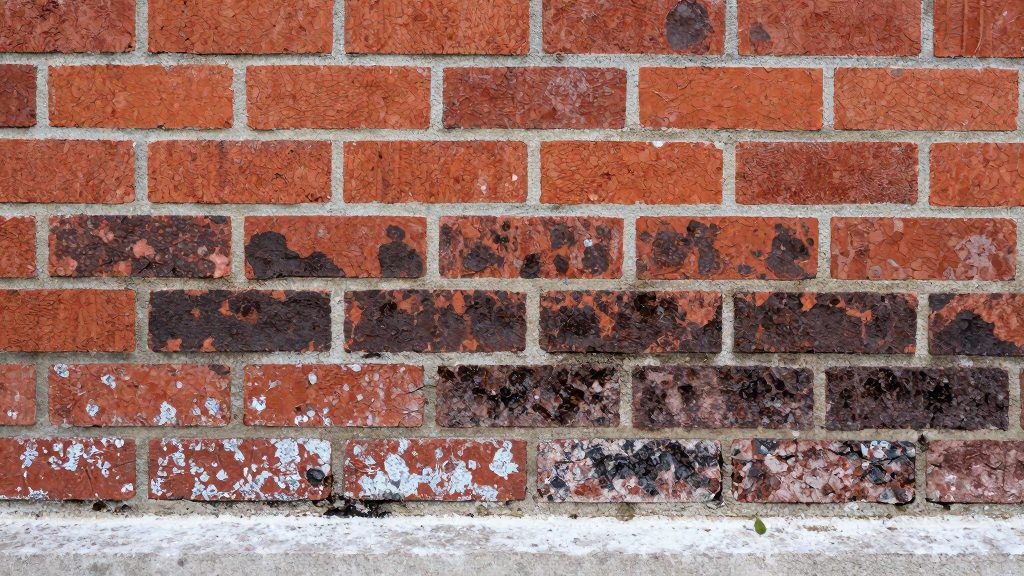
Rising damp on old brick walls usually shows first at the lowest courses, as damp patches and blistering paint at skirting level. According to Designing Buildings (summary of a BRE Digest), porous walls standing in water or saturated soil without a damp-proof course can show rising damp above 1 m.
What does rising damp look like on old brick walls?
Rising damp is read from the bottom of the wall upward. Its signs cluster in the lowest section, where moisture drawn up from the ground first reaches the surface. The height reached varies from wall to wall and depends on several factors, so signs can appear above the base.
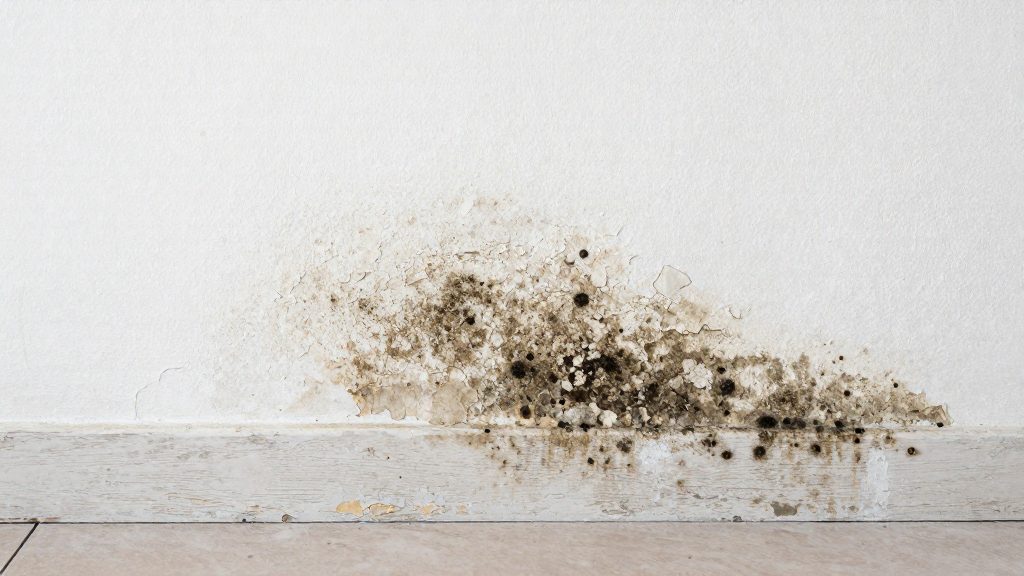
Damp patches and blistering paint at skirting level
Damp patches on the lower wall, often just above the skirting board, are the most common visual starting point. Paint in these areas can blister, with the coating lifting away from the brick as moisture pushes against it. Designing Buildings (summary of a BRE Digest) lists both damp patches and blistering paint among the signs of excess moisture.
Bulging plaster and decay of wall finishes
Plaster on an affected wall can bulge or separate from the brickwork as it takes up moisture. Finishes at the base of the wall may then crumble or lose adhesion over time. Bulging plaster is among the listed signs of excess moisture in the same source.
Mould and mildew growth at wall base
Mould and mildew tend to develop on damp surfaces where air movement is limited, which often includes the lower part of a wall against a floor or in a corner. Both are listed as signs of excess moisture by Designing Buildings (summary of a BRE Digest). Their presence on their own does not confirm the moisture source.
Tide marks and salt deposits at the base
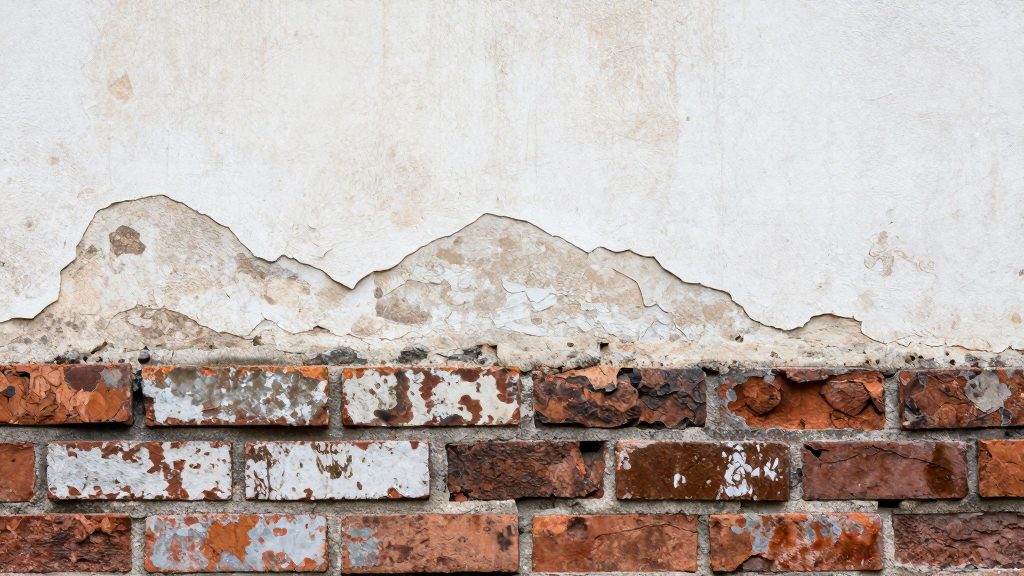
Tide marks and salt deposits are the most visible traces of water that has climbed a wall from the ground. Water drawn up through porous masonry by capillary action moves toward the surface. As it evaporates, the dissolved minerals it carries stay behind. Evaporation can concentrate at a particular height, so residue may build up in bands, although the source does not say that tide marks point specifically to rising damp.
How the tide line forms
Water rises until evaporation at the surface balances the supply from below. The salts collect at this evaporation line, which produces a band of discolouration at a roughly steady height. Repeated wetting and drying deposits more material on the same level, creating the ring-like pattern known as a tide mark. Designing Buildings (summary of a BRE Digest) lists tide marks and salts among the signs of excess moisture.
Checking the pattern
To record a tide line, mark its upper edge with a pencil and measure its height above the floor at several points. Note whether the line is level along the wall, whether it appears on more than one wall, and whether it lies beside a changing surface such as a plinth or skirting. Record these observations for a professional to interpret alongside other evidence.
White efflorescence and crystallisation
Where salts reach the surface and evaporate, they crystallise as white, powdery or crusty deposits. This is called efflorescence. It is most often seen on brick faces and mortar joints near the base of the wall. Efflorescence is one of the signs of excess moisture in the source, alongside salts and staining, and it is evidence of salt movement rather than proof of the moisture’s origin.
Chlorides, sulphates and nitrates
Salts in damp masonry can travel with water through the wall. Identifying the salt type requires laboratory analysis, not a visual check. Identifying the salt type requires analysis, not a visual check.
Is it rising damp or condensation?
Rising damp, condensation and penetrating damp can leave similar marks, so diagnosis depends on where the damp sits, when it appears and how it spreads. According to Designing Buildings (summary of a BRE Digest), the listed signs of excess moisture are damp patches, mould, mildew, salts, staining, tide marks, blistering paint and bulging plaster. The same source says these must be read together with other evidence, because the signs alone do not point to a specific cause.
Condensation on cold surfaces and wall corners
Condensation forms when warm, moist indoor air meets a surface cold enough to cool it below its dew point. In older houses this usually means external walls, especially corners, where heat loss is greatest. Mould tends to gather at the room-facing surface of corners, behind furniture pushed against external walls, and on window reveals. Unlike rising damp, the damp is not drawn up from the floor, and the pattern follows the room layout and the cold spots rather than a horizontal line.
Timing: winter peaks versus year-round wall dampness
Condensation is seasonal. It is typically worst in cold weather, when indoor and outdoor temperatures diverge most. Rising damp persists through the year because moisture moves up from the ground. The source lists heating among the variables that affect height, but it does not describe how.
Penetrating damp from rain and external leaks
Penetrating damp enters through the wall from outside. Common routes include failed pointing, cracked render, blocked gutters or downpipes, and defective flashings. It typically appears after rain, as a localised patch at a specific point, and it can sit high on the wall rather than at the base. A damp patch that is clearly linked to a point on the outside of the building points towards penetrating damp, not rising damp.
| Feature | Rising damp | Condensation | Penetrating damp |
|---|---|---|---|
| Typical location | Base of walls | Cold surfaces, external wall corners, behind furniture | Under windows, around external defects |
| Timing | Year-round | Winter peaks | After rain |
| Pattern | Horizontal band rising from the floor | Mould at corners, wet cold surfaces | Localised patch linked to a point outside |
Why a moisture meter reading is not proof
Surface moisture meters are quick, but a high reading on an old brick wall does not by itself show that rising damp is present. According to Designing Buildings (summary of a BRE Digest), salts can build up in older walls even when there is no damp problem, and high moisture-meter readings alone therefore do not prove rising damp. The reading reflects what the meter senses at the surface, not the moisture content of the wall as a whole, so the result needs to be interpreted before any conclusion is drawn.
Salts raising meter readings without moisture
Salts that have accumulated in brickwork and mortar can make a wall read as damp when little free water is present. Because salts can take up moisture from the air, a salt-contaminated area may read as damp even when little ground moisture is present. A meter reading taken on a salt-contaminated area may therefore overstate the moisture present.
Practical checks before relying on a reading:
- Compare readings on areas with and without visible salt deposits.
- Record whether the wall is affected by salts before interpreting the numbers.
Wall sampling for moisture content measurement
When the diagnosis depends on the actual condition of the wall, the Designing Buildings (summary of a BRE Digest) guidance indicates that wall sampling may be needed. Samples are taken from the wall and their moisture content is measured in a laboratory. This gives a direct measurement of the material rather than an indirect surface reading.
Hygroscopicity testing in laboratory analysis
Laboratory analysis can also measure hygroscopicity, which describes how readily the wall material takes up moisture from the air. Combined with the moisture content results, hygroscopicity testing helps separate moisture that comes from the ground from moisture drawn in by salts. The two measurements together give evidence that a single surface reading cannot provide.
| Method | What it measures | Limitation |
|---|---|---|
| Surface moisture-meter reading | Moisture sensed at the surface | Affected by salts; not proof alone |
| Wall sample, moisture content | Moisture content of the wall material in the lab | Requires sampling and lab analysis |
| Hygroscopicity test | Tendency of the material to take up moisture from air | Requires lab analysis alongside moisture content |
How high can rising damp climb?
Porous walls that stand in water or saturated soil without a damp-proof course can show rising damp above 1 m, according to Designing Buildings, which summarises a BRE Digest. The climb is not a fixed height. The same source says it depends on five variables: the wall’s evaporation rate, its porosity, its salt content, the groundwater level, and the building’s heating.
The five variables
- Evaporation rate: how quickly the wall releases moisture to the air. Record whether the damp area visibly dries between visits.
- Porosity: how open the brick and mortar are to moisture. Note the wall’s surface texture and any areas where the render or plaster has already failed.
- Salt content: record whether salt deposits are present.
- Groundwater level: the height depends on how close the water table or saturated soil is to the wall base. Record the external ground level beside the wall.
- Heating: the source lists heating as a variable without describing its direction of effect. Record the rooms and periods when the building is heated.
Measuring the height
Measure the upper edge of the damp area in inches (or millimetres) above the internal floor and the external ground level, at several points along the wall. A single reading shows only one point. Repeat the measurements over several weeks and compare them against the groundwater and heating records.
What causes it in old brick houses?
Rising damp in an old brick house begins when water moves up from the ground into a wall with no working barrier against it.
Absent damp-proof course in solid brick walls
In older solid brick walls with no damp-proof course, the masonry can stay in direct contact with moisture from the soil, and water can be drawn upward through its pores. Porosity and salt content both affect how far the moisture rises, so the same construction can show different heights in different buildings.
Mortar droppings bridging the cavity
A DPC that is present is unlikely to have failed on its own. The more likely fault is in the construction. Mortar droppings left in a cavity during building can bridge the gap between the two leaves of the wall, letting moisture bypass the course. Because the barrier itself may be intact, this defect is easy to miss on a visual check of the course alone.
External ground levels above internal floor level
Where the outside ground, paving or flower beds sit at or above the internal floor level, the wall is in contact with soil that can hold water. To check each elevation, measure from the external ground level to the internal floor and note any section of wall buried in soil. Treat any such contact as a condition to investigate.
Salts and the limits of a single reading
Confirming the cause can require wall samples, with moisture content and hygroscopicity measured in a laboratory.
Managing indoor humidity while the wall is assessed
Rising damp is driven by moisture entering the wall from the ground, so indoor humidity cannot remove the source. It can, however, decide whether a damp wall stays wet long enough for mold to establish on its surface. Managing the air around the wall limits that growth while the building fabric is assessed separately.
Relative humidity thresholds for mold prevention
Mold needs sustained moisture on a surface, and the relative humidity of the air around a wall is the main indoor factor you can measure and adjust. The practical approach is to track conditions over time with a hygrometer placed away from heaters and external doors, and to aim for stable readings rather than sharp swings.
A hygrometer measures air, not the wall. Treat hygrometer data as a check on room conditions, and do not read it as a diagnosis of the masonry.
Dehumidifiers and extractor fans in damp rooms
Remove moisture where it is produced first. Extractor fans in bathrooms and kitchens should run during showering or cooking and for a period afterward, so humid air leaves the room before it settles on cold walls.
In a persistently damp room, a dehumidifier can supplement this:
- Keep the door closed so the unit works on one enclosed space.
- Leave a gap between the unit and the wall, and keep furniture off the affected surface so air can circulate.
- Empty the water tank regularly, or use a continuous drain if the model supports one.
Trickle vents and passive ventilation during the heating season
Trickle vents provide background ventilation without opening a window. In the heating season, leave them open and avoid sealing them with tape or covers, because a fully sealed room traps moisture from breathing, cooking and drying laundry.
| Method | Function | Best use |
|---|---|---|
| Trickle vents | Continuous low-level air exchange | Bedrooms, living rooms, all heated rooms |
| Brief window opening | Rapid removal of humid air | After cooking, showering or drying clothes |
| Extractor fan | Removes moisture at the source | Bathrooms and kitchens |
| Dehumidifier | Removes water from enclosed air | Persistently damp, enclosed rooms |
Keep heating on at a steady level while ventilating. A room that is cold on its external walls is more likely to hold surface moisture, which makes steady heating part of the mold-control routine.
When to call a specialist
DIY checks can show that moisture is present, but they rarely show its cause. Escalate to a qualified building-moisture professional, such as a licensed home inspector or an independent moisture specialist, when the problem persists despite the measures you have already taken, or when the evidence points to a wall that is taking in water from the ground.
Signs that the problem is persistent
Damp that continues after you have improved ventilation and changed heating patterns is a strong reason to call a professional. A patch that returns in the same place after ventilation and heating changes deserves a proper inspection.
Reading the evidence together
A surveyor reads the signs of excess moisture together as a group, with the wall’s construction and location taken into account.
| Situation | Action |
|---|---|
| Damp returns after ventilation and heating changes | Book a surveyor |
| Moisture-meter readings are high but there are no other signs | Ask a professional whether wall sampling is needed |
| Salts, tide marks and bulging plaster appear together | Book a surveyor before any treatment |
Choosing a surveyor and reading the report
Ask about the surveyor’s qualifications and whether they are independent, meaning they do not also sell the remedy they recommend. Request a written report that explains the evidence and the reasoning behind any diagnosis.
Signs of structural decay or affected timber
Timber affected by damp, or signs of structural decay in the wall, are reasons to stop DIY investigation and involve a specialist. Assessing decay in timber should be left to a qualified inspector rather than to visual checks alone.
Frequently asked questions
How can I tell rising damp apart from other causes of wet walls?
No single sign proves rising damp. The listed signs of excess moisture must be read together with other evidence, and high readings from a moisture meter alone do not confirm the cause. Lab analysis of wall samples can be needed for a reliable diagnosis.
If my house has a damp-proof course, can rising damp still happen?
A damp-proof course that is present is unlikely to fail on its own. Defects such as mortar droppings bridging a cavity can let moisture bypass it, so it is worth inspecting the wall for those faults before assuming the barrier is sound.
How high up an old brick wall can rising damp reach?
Rising damp can reach above 1 m on porous walls that stand in water or saturated soil without a damp-proof course. The actual height depends on the wall’s evaporation rate, porosity, salt content, groundwater level and heating, so no single height applies to every wall.